An example of creating an advisor in the designer
Today, automating the Forex trading process is not just a whim, as it once was, but a vital necessity.
Creating an advisor is the best solution to a person's corrupted discipline, absent-mindedness and greed.
Many people avoid automating their systems because they believe that they need to know a programming language or pay a huge amount of money to a programmer to implement their own ideas.
In fact, traders who know programming languages have long since prepared solutions for people like you and me and created special advisor builders.
Thanks to them, you can realize almost any of your ideas.
Despite the abundance of expert advisor builders available online, creating them remains a significant challenge. Unfortunately, people launching builders for the first time are faced with a multitude of different symbols and signs that discourage them and prevent them from moving forward.
Understanding this problem, we decided to write an article with an example of creating an advisor in Ensed Cor constructor.
Strategy
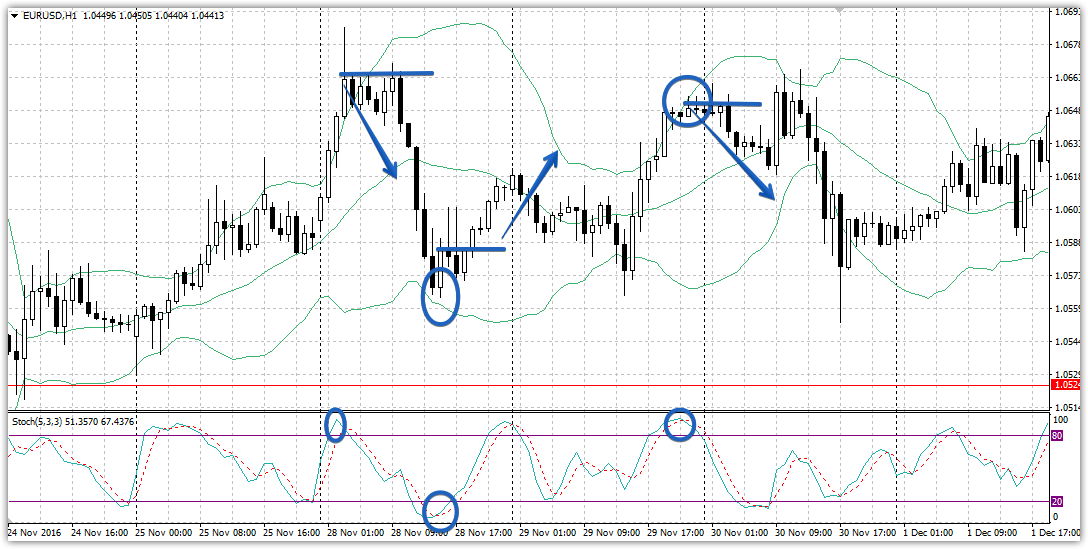
For automation, we chose a fairly simple strategy based on the Bollinger Bands and Stochastic indicators. It's no secret that Bollinger Bands form a kind of channel, from whose boundaries traders either buy or sell.
The stochastic oscillator allows you to identify overbought and oversold zones, amplifying the signals from the bands. This strategy is far from new and is familiar to all traders.
So, we buy if the price touches the lower Bollinger Band and the Stochastic is in the oversold zone, and we sell if the price touches the upper Bollinger Band and the Stochastic is in the overbought zone. The strategy's chart representation is shown below:
Creating Strategy Criteria in Ensed Cor
Once we've decided on a strategy, we need to examine the tactical rules from the perspective of the programmer and designer. The strategy involves the interaction of price and Bollinger Bands, while the instructor's toolkit includes a modest set of comparisons and variables.
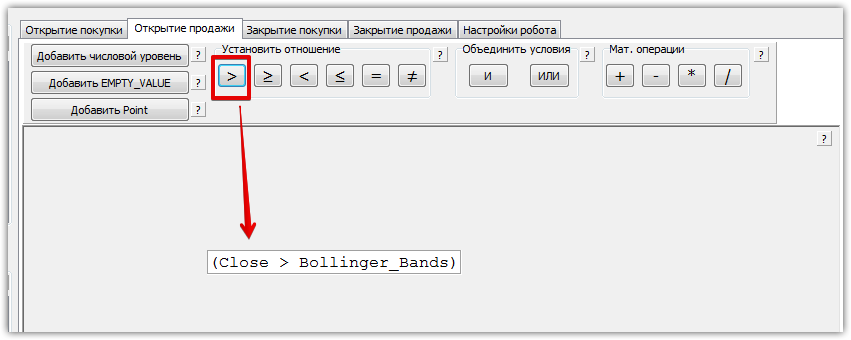
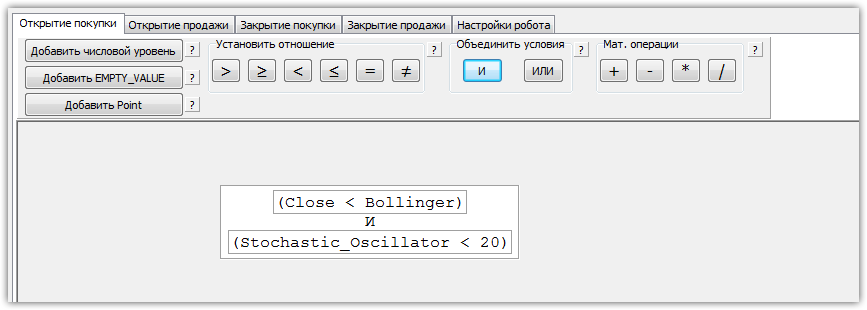
So, if we look at it from the algorithmic point of view, the entry into the market to sell occurs not at the moment of touch, but in the event that the closing price is higher (greater) than the upper Bollinger band, and the stochastic line is above the 80 level.
Thus, to enter a sell trade, we need to meet two simultaneous conditions, namely, the closing price must be above the upper band, and the stochastic line must be above the 80 level.
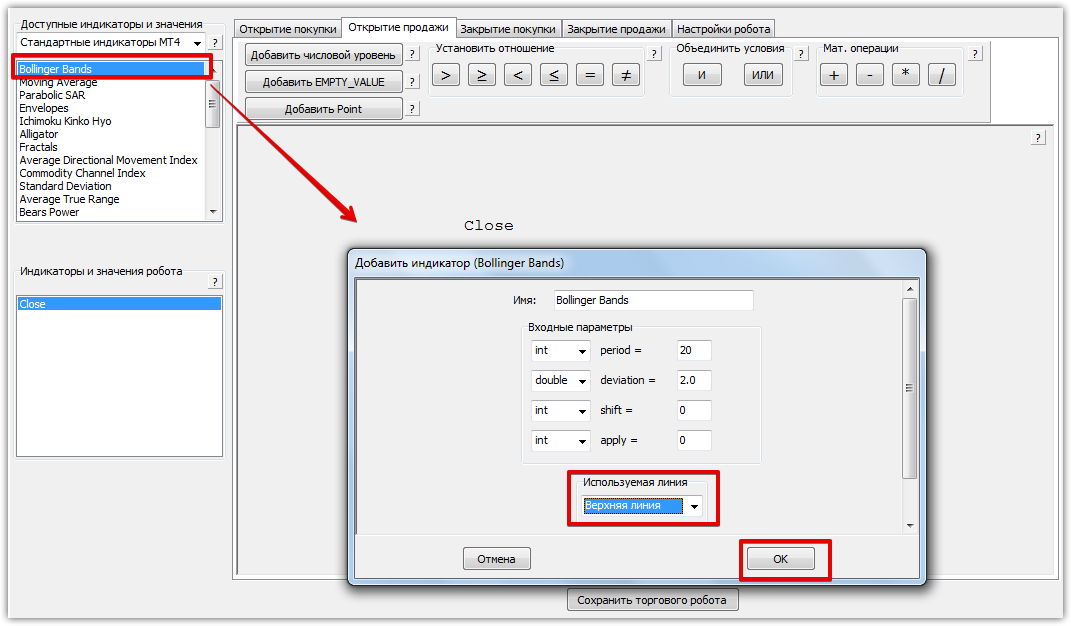
To implement this idea, in the "Available Indicators and Values" line in the upper left corner, drag the "Close" value and Bollinger Bands to the sell position opening area. When adding a Bollinger Band, select "Upper Band" from the "Used Line" menu.
Next, select these two variables and specify that the closing price is greater than the upper Bollinger Bands line. To do this, select the greater-than sign in the "Set Ratio" section.
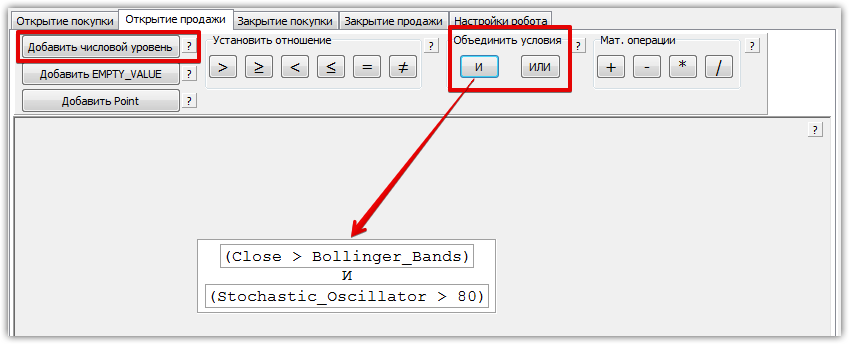
Next, we'll define the second condition by dragging the Stochastic indicator onto the workspace. Since we'll be working with overbought levels, we'll need to add a numeric level of 80. As with the first condition, we'll specify that the Stochastic line value must be greater than 80.
Since these conditions must be met simultaneously, you need to combine the blocks by selecting them and clicking the letter "I" in the "Combine Conditions" section. Example:
Next, using a similar principle, we assign conditions for buying, only in this case, the lower Bollinger Bands and the oversold level of 20 are taken into account. The formula for entering the market and comparing is the reverse. Example:
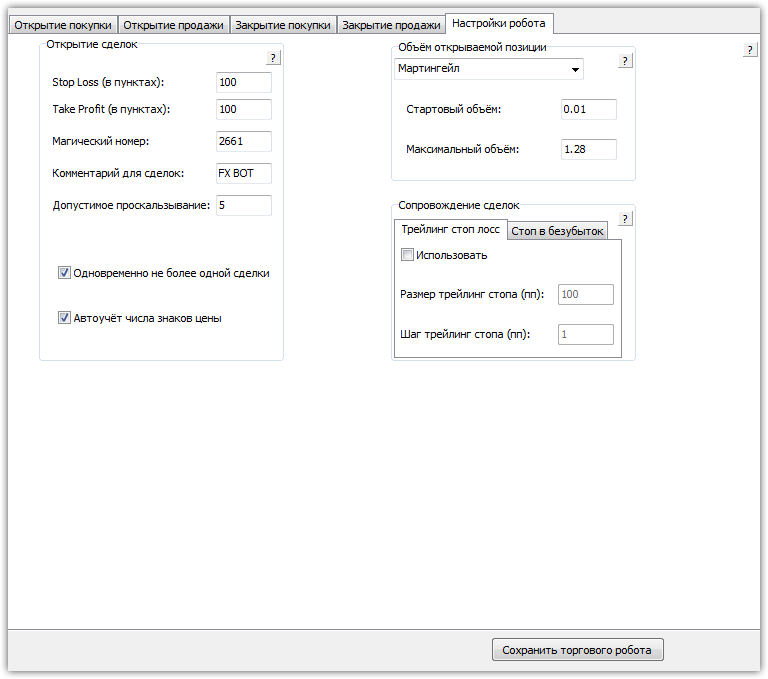
Since the exit from the market will occur either at a profit or by a stop order, we do not specify conditions in the “Closing a purchase” and “Closing a sale” sections.
Next, proceed to the final section, "Robot Settings," where we select "Martingale" and set the minimum and maximum lot sizes, profit size, and stop loss. Once the values are entered, click "Save Trading Robot," after which the expert advisor will appear in the terminal.
Testing the strategy
So, after creating the Expert Advisor, the final step is backtesting it in the strategy tester. Since the Expert Advisor can be created using the builder for any currency pair and timeframe on Forex, we decided to test the Expert Advisor using the included strategy on the EUR/USD currency pair on an hourly timeframe for 2015. The test results are below:
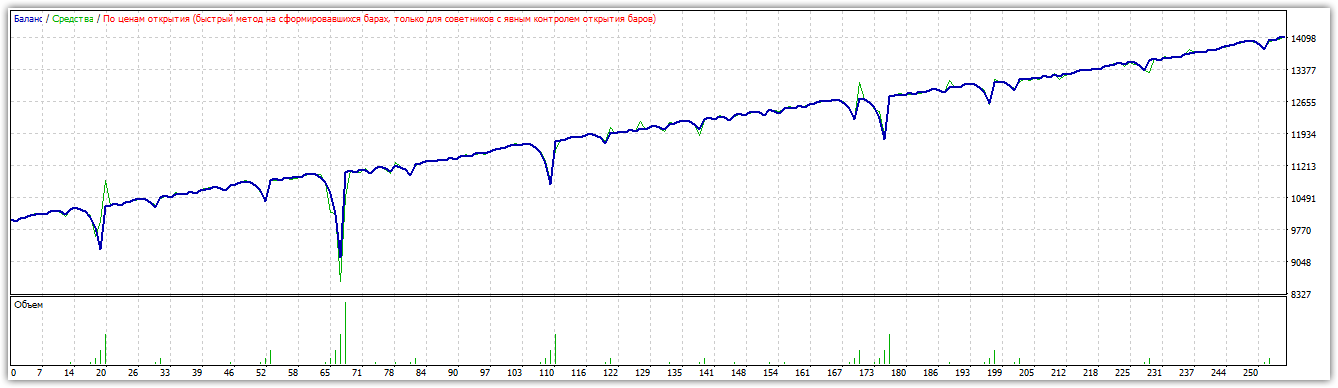
As you can see above, the advisor was able to earn 40 percent per annum with a 20 percent drawdown, and this is despite the fact that the strategy was plucked from thin air and implemented in literally 15 minutes.
Therefore, we recommend following our example and creating your own advisor in the Ensed Cor builder. You can download the advisor at the end of the article.
Download the advisor created on Ensed Cor